1 Optimisation using LoD[]
This method is of use in big, open outside locations with a wide range of camera view. Elements of terrain with Texture Paint and building are useful here. Prepared object with low detail level should match in colour with the original object, so it is the best to prepare the texture using screen capture. Lightmaps are also generated with the same light sources as the basic parts of the location. Simplified geometry has to be in the same position as the original one (the picture below presents the visual schema).

Elements of the LoD system have to be linked together in a proper linking hierarchy. For each object in the LoD system, there has to be a special dummy type support object with a precisely specific name: LoD_Dummy00 (00, 01, 02… etc.). Basic elements of the location (can be grouped) and prepared object with low detail level are linked to this object. Each of these has to have AuraLoD modifier assigned, where it is defined on what LoD level a given object is placed.

You should also apply the reflections only on the basis of simplified geometry. In order to do so, you should turn off the reflection in the basic object, and turn it on in the simplified object with “Ignore LoD reflections” option checked (thanks to this, only simplified geometry will be visible in reflections – regardless of the distance).
2 Antiportals[]
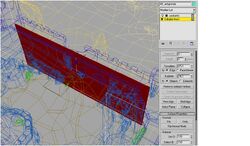
This method is best used in locations with walls, buildings, mountain ranges which (with their big surface) could block the view of distant places. Inside of such location’s obscuring elements we place a special object consisting of polygons called antiportals. Each polygon which is to be an antiportal, has to have proper material’s ID (above 130), be flat and convex. The less antiportals in the scene, the faster the system will work (there is certain overhead in using them). The key is to find the “golden mean” – the number of antiportals allowing to reject large amount of geometry and, at the same time, not overloading the system of determining the visibility.

Because antiportals cut off the visibility of whole objects, the scene has to be prepared so that it enables this operation. Antiportal enables cutting off the visibility of an object which is entirely obscured by it. You have to remember that the visibility test is run on the basis of bounding box of the object and not on its precise geometry. All antiportals are polygons within one object. Another material’s IDs determine further antiportals. IDs have to be assigned one by one starting from 130. Additionally, object of Editable Mesh type containing antiportals, has to have Sectorinfo modifier assigned. In order for it to be exported, it has to be linked to location’s AuraBase.

3 Sectors[]
Sectors are something opposite to antiportals. They are used for optimising inside locations, consisting of separate rooms joined by corridors. Each room is lined with geometry called ‘sector’. The sector causes cutting off the visibility of objects located outside of it. Sectors are connected together with a special wall called portal, which does not cut off the visibility (it’s a window). Sectors, just like antiportals, are defined by material’s ID within one object of Editable Mesh type.


The Sector has to be a convex mesh and have consecutive ID’s ranged 2-129 assigned. The Portal has to be flat and have material’s ID 1 assigned. The whole object should have vertices welded together, so such construction cannot exist as Editable Poly.
Next sectors are separated with portals which serve as windows. The location should be prepared, so that individual elements are located entirely within subsequent sectors. Location’s element which goes through the surface of the portal will be visible in the both sectors joined by this portal. That is why such elements going through portal should be small.
Object of Editable Mesh type containing sectors and portals has to have Sectorinfo modifier assigned, just like antiportals. In order for it to be exported it has to be linked to location’s AuraBase. During export there is an information file “sectors” created. It is not indispensable for the location to work. It can be used for identifying sectors’ IDs and portals, if there are any errors during the export.
Requirements concerning meshes describing sectors/portals:
- convex (otherwise the room will report an error: “Sector [x]: plane outside predefined volume”), possibly least complicated (number of limiting surfaces),
- vectors pointed normally “outside” the sectors,
- each portal has to belong to precisely two sectors (join them),
- the portal has to have at least four vertices, the best would be to have exactly 4 (we avoid complicated shapes),
- each portal’s vertex has to be on the same surface,


4 PVS Optimisation[]
PVS – optimisation of the number of visible objects/polygons on location.
We do it manually:
1. Run the game
2. Run the location
3. Stand in the place, you want to start…
4. Type “pvs edit” in the console
5. What we see is the frame showing the currently edited room, where our character is. Pressing "l-ctrl", we can see the rest of the rooms on the location; those which we didn’t visit during the edit are marked red.
6. We move the camera in every possible direction – use all three cameras (I suggest first using the “F2” camera, then “F3-TPP” and finally “F1”) – we change the point inside the edited room from time to time.
7. In the console we type: “pvs test” – thanks to this we can check whether, while walking around the location-room, nothing vanishes for sure (if so – we go back to editing with “pvs edit” command, setting the vanishing object in the view).
8. We repeat this activity, typing “pvs save” from time to time, in order to save the file with the data in the directory with location’s .mdl file. They are saved in the file – location_name.pvs
9. If we want to unload the whole generated data, we type “pvs remove” – it removes loaded data from the memory. Re-loading our work saved in location_name.pvs – with “pvs load” command.
The whole process should take place on the final mesh of the location. Any changes in the mesh result in difficult to predict problems with objects’ visibility. That’s why, in order not to repeat this quite laborious process every couple of minutes, you should wait with the implementation till the final form of the location. The same is the case with the decoration – if we generate the pvs on undecorated location, we probably won’t have such a big efficiency leap as opposed to doing it from the beginning on the final decorations – it doesn’t mean, however, that this is totally inadvisable or impossible :)
One final word – under no circumstances, should you generate pvs with unlocked (free) camera in debug. Then you cannot expect any efficiency leap at all.